Wednesday 16 December 2015

final images


For my final images i chose to do work in the style of Gerard Clausing as his work intrigued me. His work was so unusual and unique. We were asked to produce our own adaptation of an artist work so i decided not to do my images as close as in some Gerard's work there is no back ground and some you can't really tell what they are. I shot this using one snoot attached to a flash kit. I then experimented with my settings when i got the settings i wanted they were 1/30 f. 14 and iso 100 this is what i needed to get it all in detail and the lighting i wanted by using the one snoot this gave me the light and the direction of the light i needed as the light was on 2 so it wasn't very bright as Gerard's images are quite dark. I did basic editing to my images in Photoshop such as exposure and levels. I  am really pleased with my final images as i feel like they relate to Gerard's images. I am really happy with the shadows and detail in my images as i used a small aperture. I got what i wanted to achieve with my images and i had no real problem when creating these images,


Lighting used


tonal ranges


here we focused on tones and tonal ranges this was done using the soft box and a flash kit these were also about figuring out the settings for your camera with the light meter. These were shot at f.22 1/125 of a second and ISO 100 these were shot only using a soft box with a flash attached to them. I first did a shot at  f.11 however this came out very over exposed  and washed out so i went up to f.22 which is a very small aperture to get the correct amount of light in to get the tonal ranges i wanted. It was important to have the iso on 100 as we wanted clear images and the tonal ranges to be crisp without noise in the images.

Research blog 3

Safety when working in the studio


  • all cables and wires must be stuck down to prevent hazards of people tripping in the studio.
  • make sure all legs on the light stand and tripods are level so the stand do not topple over.
  • be very careful when placing the light on the stand as the light can be heavy and make sure the stands are at a height that easy for you to place the light on the stand.
  • Be careful when taking the cover off the light as you don't want to get grease marks on the lighting. 
  • be extra careful when switching lights as the bulbs are very fragile 
  • make sure you are in bright light when setting up the studio as you want to be able to see what your are doing.
  • the covers must be removed before switching on the lights.
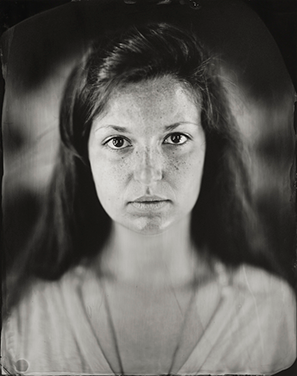


Rembrandt Lighting


Rembrandt lighting is mainly used for portraits as it creates very atmospheric effects and creates dimension by sculpting the face with light. This is used by using one key light and sometimes a reflector this is used to make highlight lighter for a more dramatic effect. I think Rembrandt can make very flattering images as they are soft and have an element of beauty to them. It causes drama but also in a calming way as the shadows are dark but the images are soft. I really like this lightening technique as it really focuses on shadows and highlights and there are so many different tonal ranges and details in the images.


Dark Field lighting


This is used often for product photography this is done by placing 3 black boards in a triangle and one light behind   the back bored with a flash attached to it.Then you would make the room dark. I really like this technique as it very atmospheric and kind of creepy. I like the fact you can only see the outline but you can still the dimension and colour of the product, This is very good for product photography as it creates a very unusual effect that is striking the eye,


Clam shell lighting


This kind of lighting is good for portraits especially to do with beauty as the light is flat and even. This technique is achieved by having two soft boxes or diffused light ether each side of your model  or above and below them. I like this technique as the images are very flattering they also make the images look very natural.This would be very good for portraits where you want to focus on natural beauty.


Flash Metering


This is done by using a light meter. you first need to place your model infront of the lights and take a reading from the side of there face around the cheek bone area you then set the flash. The light meter will then tell you 3 readings you need this will be the iso the f stop and the shutter speed you will then need to put your camera on manual and put these readings into you camera this should make your images perfectly exposed.


Beauty dish technique


here we experimented using the beauty dish. This is a big silver disc that is attached to one of the lights and then to the flash this creates such flattering effects to your images creating soft light that sculpts the light. with these images i only used the beauty dish however a soft box could of been used if i wanted to lighten the dark shadows but in a soft way. I really liked the way beauty dish made my images looked as they are very flattering and have a lot of dimension to them also the shadows and highlights are very clear and strong. This kind of lighting would be very good for product photography the images are very appealing to the eye. If i was to do this again the i would add another light such as a soft box so the shadows are not as dark. I think these images are very successful as this was the first time I used a beauty dish and I am really happy with the results I got.

Research blog 5


Kelly Anderson- Stayley


Matthias Olmeta


Dmitry Ageev


Sally Mann


Christopher Anderson


Micheal Ackerman


Jeremy Cowart


Steve Mccurry


Gerard lelieveld